Strawberry & Yoghurt Cake (egg free)

It’s a sign that your children are getting older, when they no longer request birthday cakes from the Women’s Weekly Birthday Cake cookbook, and instead choose a cake like this one.

My Soccer, V8, Formula 1, BMX, Rugby and Go-Kart loving son, who typically doesn’t like anything sweet and usually chooses chips over cake, requested this cake for his birthday this year.

The only way to describe this cake is simply lovely.

Originally a Neil Perry recipe, I have lowered the sugar a little, and found no difference with the way it cooked and tasted, and changed the way he serves it to suit my family.

For those not use to cooking with polenta, it gives a little ‘sandy’ texture to the cake, which adds to this cakes personality.

The cooked strawberries go a little ‘jammy’ and when eaten warm, you feel like you are eating a beautiful cake with pocketfuls of jammy goodness.

And to top it all off, it’s exceptionally simple to make. One bowl, a whisk and a spoon…..even my 4 year old helped to make this one.

Strawberry & Yoghurt Cake (egg free)

  • Prep Time: 20m
  • Cook Time: 1h
  • Total Time: 1h 20m

Ingredients

  • 200 grams polenta
  • 200 grams self-raising flour
  • 200 grams castor sugar
  • 1 teaspoon baking powder
  • 300 grams natural yoghurt
  • 110 grams butter, melted
  • 200 milliliters warm water
  • 300 grams strawberries, washed, hulled and chopped
  • extra strawberries kept whole to decorate
  • icing sugar to dust

Method

  1. Preheat oven to 170 degrees celsius.
  2. Grease and line with baking paper a 20cm springform tin.
  3. Place all the dry ingredients in a mixing bowl and whisk with a hand whisk to combine.
  4. Make a well in the centre, add yoghurt, butter and warm water and mix with a spoon until well combined.
  5. Stir through the strawberries gently.
  6. Bake for 1 hour or until a skewer inserted comes out clean. This may be different for different ovens. If not cooked after 1 hr, keep checking it every 15 minutes after.
  7. Leave to cool in tin on a cooling rack for 15 minutes, then remove from tin to cool completely.
  8. Dust with icing sugar and top with remaining strawberries to serve.
  9. This cake will keep for 2-3 days covered in the refrigerator.


Date & Walnut Muffins

Hey Friends,

I am trialling a new recipe format, that is hopefully easier for you to read and follow and also allows you to print the recipe out.

Let me know what you think.

Em x

These are the best low sugar, high fibre and protein muffins I have tasted in a long time!

The original recipe is from Curtis Stone’s cookbook Good Food Good Life. I swapped his plain flour for wholemeal spelt flour and added some extra dates for good measure.

These are nutty and moist and with the hint of orange and honey coming through, they should be a hit in your house too.

Date & Walnut Muffins

These low sugar, high protein Date and Walnut muffins are nutty and moist, with a hint of orange and honey.

  • Prep Time: 10m
  • Cook Time: 20m
  • Total Time: 30m
  • Yield: 12 muffins
  • Category:

Ingredients

  • 1 1/2 cups rolled oats
  • 1 cup plain wholemeal spelt flour
  • 2 teaspoons baking powder
  • 1/2 teaspoon bi-carb soda
  • 150 grams unsalted butter, softened
  • 1/4 cup brown sugar
  • 2 tablespoons honey
  • 3 teaspoons finely grated orange zest
  • 1/2 teaspoon cinnamon
  • 2 eggs
  • 2/3 cup plain greek or natural yoghurt
  • 1 1/2 cups walnuts, toasted and finely chopped
  • 16 dates, pitted and chopped

Method

  1. Preheat oven to 190 degrees C.
  2. Line muffin trays with cases.
  3. In a medium bowl, mix oats, flour, baking powder and bi-carb soda and whisk with a hand balloon whisk till combined.
  4. In the bowl of an electric mixer, cream butter, sugar, honey, orange zest and cinnamon until creamy.
  5. Beat in the eggs, one at a time.
  6. Beat in the yoghurt, then add the dry ingredients and beat gently until just combined.
  7. Using a spatula or spoon, gently stir in walnuts and dates.
  8. Divide the batter evenly among the cases and bake for 20 minutes or until golden and cooked when tested with a cake tester.
  9. These are best eaten warm and fresh, but will last for a couple of days in an airtight container. Alternatively, you can freeze them individually wrapped.

Poached Egg with Halloumi & Pan Fried Asparagus & Mushrooms (vegetarian)

Even passionate cooks need a night off from the kitchen.

In our current season of life, that is Sunday night for me.

After a week of meals that they have no choice but to eat, Sunday is the one night where my boys can choose (within reason) their own dinner. It’s often leftovers, a toasted sandwich, pasta and cheese, or ‘Upside Down Dinner’ which is when they have their favourite breakfast for dinner. I still try and get some carrot sticks or something nutritious into them, but generally, it’s our most relaxed ‘whatever works and is in the house’ dinner night.

This leaves me with a much needed night off from being the chief decision maker and vegetable enforcer, which I admit, does feel good.

I potter around the kitchen with the kids and my husband, but try and take a back seat, as I encourage my older boys to help construct their own meal.

Out of everything I will eat in a week, my Sunday night dinner is my favourite meal. It’s one of our most simple….but because I haven’t made it, it just tastes AMAZING.

So, what is this Sunday night dinner I hear you say?

Eggs.

Yep. Eggs.

Simple, cheap, nutritious eggs.

A few years ago my husband, who doesn’t spend a great deal of time in the kitchen, decided he wanted to learn how to poach eggs. I decided not to get involved and leave him to learn this for himself (best for our marriage that way!) Over time, he researched and perfected how to poach the perfect egg, and thus it has become the meal he cooks for me every Sunday night.

AND I LOVE IT!

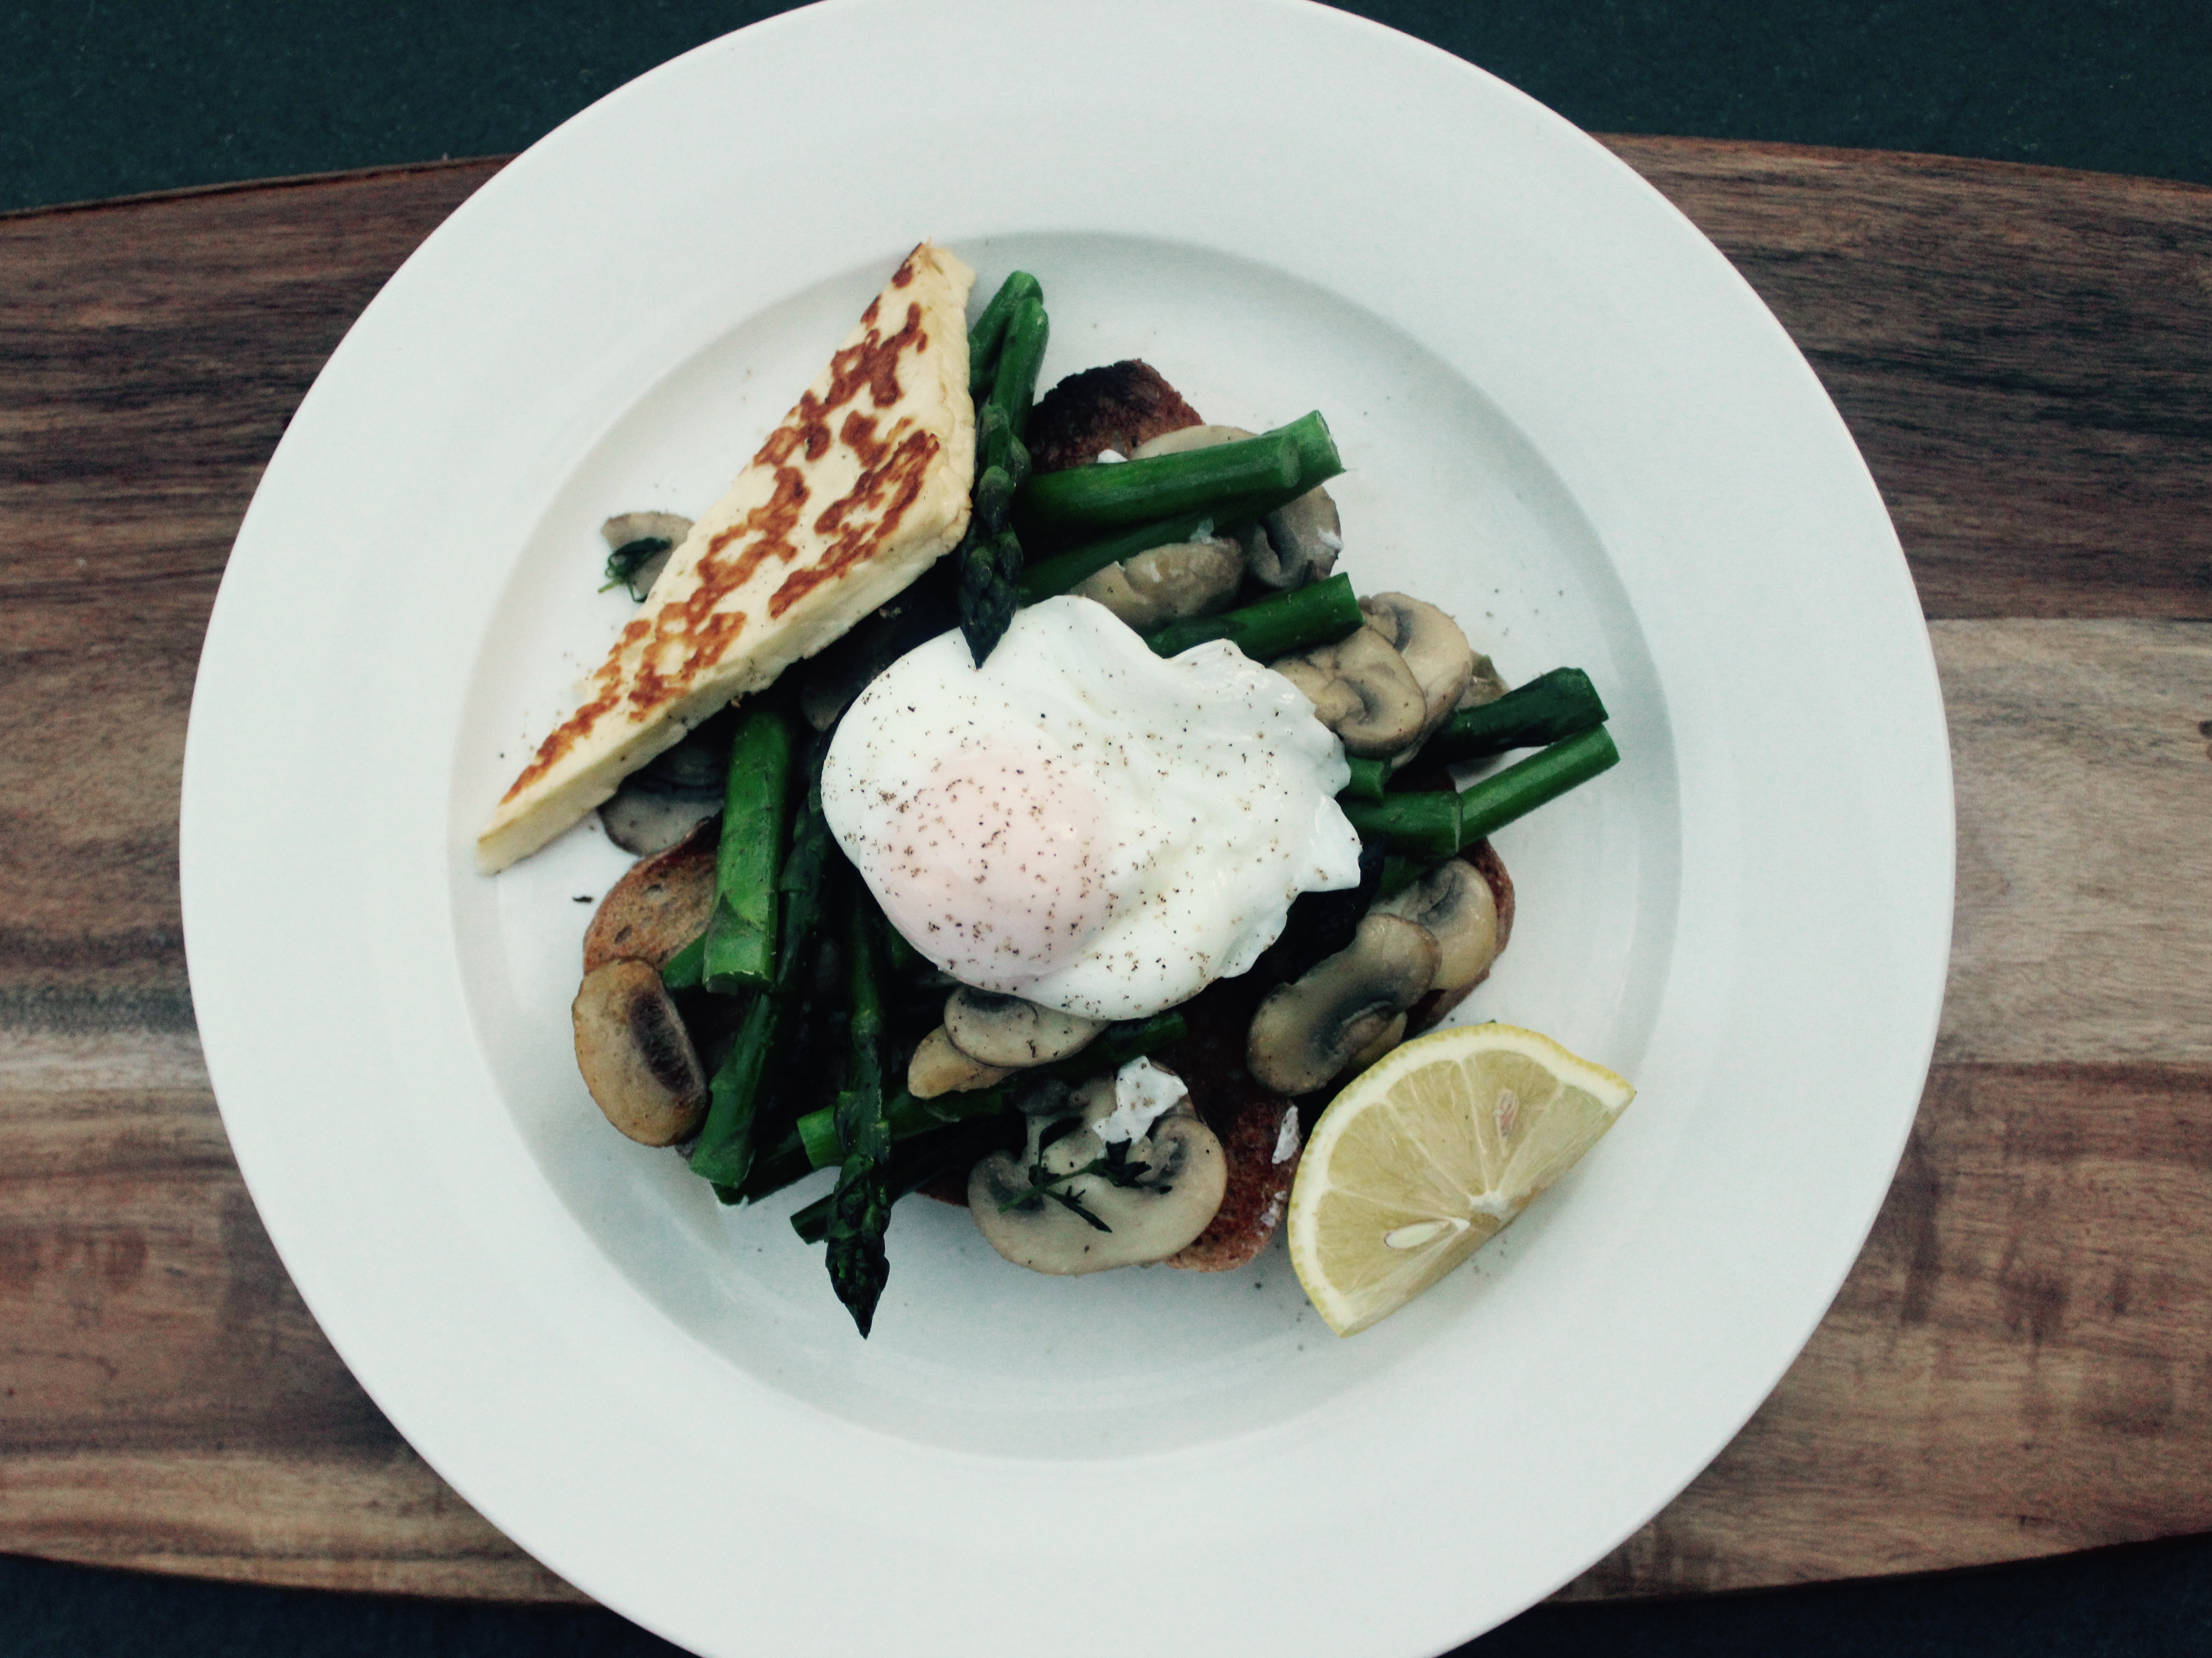
I am usually banished from the kitchen altogether, for fear I will take over (Me? Take Over?) or if permission granted I get given ‘toast and extras’ duty, ie. roast the tomatoes, fry the halloumi, chop the asparagus.

Truth be told, it’s actually one of my favourite times of the week, having my man in the kitchen with me….doing something I love so much….together.

I know the best way to poach an egg can be highly controversial, but below is the way my husband swears by and I can attest that it tastes pretty darn good.

Ingredients

2 eggs per person

1 block of Halloumi cheese, cut in half horizontally

1 bunch of fresh asaparagus, ends trimmed, cut in half

a large handful of button mushrooms, washed and sliced

zest and juice of 1/2 a lemon

1 clove garlic, crushed

a few sprigs of fresh thyme

approx 2 tablespoons of butter, for frying

sourdough bread to toast

salt and pepper to season

Method

Get your toast ready for toasting.

Melt butter over a medium heat in a frying pan.

Add garlic, mushrooms, thyme and lemon zest and fry until mushrooms are softening and slightly golden.

Add asparagus and fry for another 2 minutes, or until they are slightly soft.  Remove from pan and cover to keep warm.

Place the frying pan back over medium heat and add a little extra butter. Once melted, add the Halloumi and fry on both sides until golden. Remove from the pan and pour the lemon juice over the Halloumi.

To Poach Eggs

Bring a medium size saucepan of water to a rapid boil with a lid on.

Remove the lid, crack the egg flush to the water surface and open shell slowly, so as it hits the water, the egg white seals almost immediately.

Leave in boiling water for approximately 60-90 seconds, or until the egg yolk is cooked to your liking.

Remove with a slotted spoon.

Plate up the toast, vegetables, egg and halloumi. Season with salt and pepper and serve with a lemon wedge if desired.


The Journey Matters

It’s amazing how often my kids are teaching me things.

On our recent few days away during school holidays, we took the boys fishing. ‘We’ being my husband organised the gear, bought the worms, found a good spot and I quietly enjoyed watching the going’s on from my fold out chair. There isn’t a lot I don’t do as a mum of all boys, but fishing……well, I have to draw the line somewhere.

Anyway, it was sunny but a chilly wind was blowing. The boys took their casting lessons from their Dad and then it became a waiting game. And waiting….waiting…..This is a pretty big deal for my ‘always moving’ boys.

After using all our worms, and by the time we were feeling cold and hungry, we packed up into the car and started driving home.

Just as I was about to apologise to the boys that it hadn’t turned out as planned and I was sorry they hadn’t caught any fish…a voice piped up from the back seat.

“I love fishing so much. That was the best ever.”

So apparently in their mind, it was never really so much about the end result of catching the fish after all.

In the same week, I came across these beautiful words in a book “Raising Kids with Character that Reallly Lasts” by John & Susan Alexander Yates. I am yet to read the whole thing, but this part made me sit up and listen.

We will never ‘arrive’ in Family Life. 

When I was surrounded by small children, I thought, ‘If I can just hang on until they are older, I can relax.’

It was as if I viewed life as ladder rather than a garden. 

I was always struggling to get to the next rung, the next season in life, 

So focused would I become on simply making it to the next stage that I often missed out on the blessings of the moment.

And at the next age, more challenges were waiting.

There were different character traits to work on and new circumstances in my own life that revealed weaknesses. 

Would I ever ‘get to the top?’

Life is not a ladder to climb, but a garden to enjoy.

The gardeners joy is in his work, a job that is never finished.

He delights in the process of the work.

Our work in families is never finished.

We will never perfect character, nor will our children.

We are people in process. 

Yet there is joy in the process if we relax, knowing that the blessing is in the journey rather than the completion of the job. When we relax, the atmosphere of our homes will become less tense and more joyful and we will rely more on the power of the Master Gardener.

Amen to that x


Not-Too Spicy Beef and Rice Noodles with Cashews

So when I say the words ‘beef mince’ your mind goes straight to Spaghetti Bolognese? Thought so….

Well, it’s time my friend, to start exploring other ways to use beef mince in your meal plans!

We love this super easy, quick and fresh noodle dish using regular old beef mince.

Loaded with asian flavours and finished off with lots of fresh coriander, mint, and a generous handful of toasted cashews, it is a perfect mid-week meal for you and your family. You can increase or reduce the amount of curry paste or chilli based on how spicy your family likes their food.

The original recipe idea came from DELICIOUS magazine, September 2008.

Serves 5-6

Ingredients

250gm rice vermicelli noodles (very very thin rice noddles found in the asian ingredients isle of your supermarket)

1 tablespoon of peanut or sesame oil

2 tablespoons lemongrass, pale part of stem, finely chopped

2 teaspoons grated fresh ginger or ginger paste

2 garlic cloves, finely chopped

1/2 teaspoon dried chilli flakes

500gm beef mince

2 heaped teaspoons of Thai red curry paste (more if your family likes it more spicy, this was quite mild)

1 red capsicum, de-seeded and finely chopped

100gm of fresh green beans, ends trimmed and cut into small pieces

2 tablespoons fish sauce

juice of 1 lime

a handful of fresh coriander leaves

a handful of fresh mint leaves

1/2 cup roasted cashews or peanuts, chopped

Method

Soak the rice noodles in boiling water for 5 minutes, drain, refresh under cold water and divide among serving bowls.

Heat the oil in a frying pan over medium heat, then add lemongrass, ginger, garlic and chilli flakes and stir-fry for a minute.

Add the beef mince, and cook, breaking up the clumps until well-browned.

Add the curry paste, beans and capsicum and mix thoroughly.

Cook over a medium heat for a few minutes until the veggies are a little softer.

Add fish sauce and lime juice and give a big stir.

Remove from heat and divide amongst the serving bowls.

Garnish each dish with fresh coriander, mint and chopped toasted cashews.